Wednesday, December 8, 2021

Closing the Initial Gap on Grafana State Timelines (Flux queries)

I have an application that feeds periodic state into an influxdb 2 table.  This data can be queried rather simply:

from(bucket: "vpp")
  |> range(start: vTimeRangeStart, stop: v.timeRangeStart)
  |> filter(fn: (r) => r.uuid == "${uuid}" and r._field == "State")|
  |> last()
  |> keep(columns: ["_time", "_value"])


This sort of works, but it causes an unsightly gap in the data.  A state exists there, but it is before vTimeRangeStart so the query doesn't see it.


My flux solution to this problem is to fetch an initial value up to 24 hours prior to vStartTime.  That proved to be a little tricky but Flux does provide an experimental way to manipulate times:

import "experimental"

initialStateTimeRangeStart = experimental.subDuration(
    d:24h,
    from: v.timeRangeStart
)

Using this you can then get an initial state:

initial=from(bucket: "vpp")
  |> range(start: initialStateTimeRangeStart, stop: v.timeRangeStart)
  |> filter(fn: (r) => r.uuid == "${uuid}" and r._field == "State")
  |> last()
  |> keep(columns: ["_time", "_value"])


Here is the complete query fetches the initial state and appends it to the recent data:

import "experimental"

initialStateTimeRangeStart = experimental.subDuration(
  d: 24h,
  from: v.timeRangeStart
)

initial=from(bucket: "vpp")
  |> range(start: initialStateTimeRangeStart, stop: v.timeRangeStart)
  |> filter(fn: (r) => r.uuid == "${uuid}" and r._field == "State")
  |> last()
  |> keep(columns: ["_time", "_value"])

recent=from(bucket: "vpp")
  |> range(start: v.timeRangeStart, stop: v.timeRangeStop)
  |> filter(fn: (r) => r.uuid == "${uuid}" and r._field == "State")
  |> keep(columns: ["_time", "_value"])

union(tables: [initial, recent])
  |> sort(columns: ["_time"])
  |> yield()


with a pleasant result that extends the previous state on to the graph:


A few things to watch out for:

  • It appears to me that v.timeRangeStart is a 'time' in grafana and a 'duration' in chronograf (or influx 2). For most queries you won't notice this, as range() accepts either, but in this case, in chronograf you have to convert the time to a duration first, so the time calculation is a bit different (see below)
  • The documentation for union warns you that the sort order is not necessarily maintained, and they are right.  That sort() at the end is required.
  • Multiple yields lets you see what's happening along the way, so feel free to inital |> yield(name: "initial") and recent |> yield(name: "recent") if it helps with debugging.

As I mentioned, in the chronograf or influx data explorer you need to modify the time offset calculation:

initialTimeRangeStart = experimental.subDuration(
   d: 24h,
   from: experimental.addDuration(
      d: duration(v: v.timeRangeStart),
      to: now()
   )
)

I don't find this ideal but it's still useful to know how to do it, as developing queries in influxdb data explorer is something I find easier as it seems to give more meaningful error messages when things go haywire, and it's a little better at presenting the raw query results.

Note: I'm not sure that anybody reads any of this, I know that the search indexes all cover it, so perhaps somebody will find this useful some day.  If you're that person, feel free to comment here so I know someone is listening, thanks in advance!

Thursday, January 30, 2020

Influx 2.0 queries with Grafana


Influx 2.0 (flux) queries in grafana are a little on the messy side.  Here are a comple of examples that might be useful.


Here is an example of summing up a number of fields for display on a "single stat" panel widget

from(bucket: "powermon")
|> range(start: -1h)
|> filter(fn: (r) => r._measurement == "modbus")
|> filter(fn: (r) => r._field == "pv1" or r._field == "pv2" or r._field == "pv3" or r._field == "pv4" or r._field == "pv5" or r._field == "pv6" or r._field == "pv7")
|> last()
|>keep(columns:["_value"])
|> sum()


When playing with graphs, things are more or less as you'd expect:

from(bucket: "powermon")
|> range(${range})
|> filter(fn: (r) => r._measurement == "modbus")
|> filter(fn: (r) => r._field == "pv1" or r._field == "pv2" or r._field == "pv3" or r._field == "pv4" or r._field == "pv5" or r._field == "pv6" or r._field == "pv7")
|> aggregateWindow(every: 1m, fn: (tables=<-, column) => {
return tables |> mean(column: column) |> map(fn: (r) => ({r with _value: r._value*1000.0}))
})
|> yield(name: "mean")


Wednesday, July 12, 2017

Table-driven holes in Solidworks

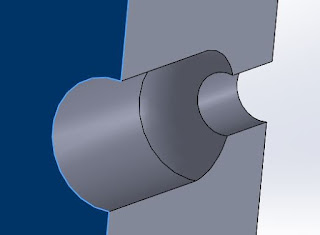
I recently had occasion to want to create a series of holes in Solidworks.  The hole definition isn't complicated but it has a few parts to it - the specific shape I am going for cups an LED and couples it to an acrylic light pipe.  This is embedded into a large plastic plate, which could be a base plate or perhaps a cover.  The hole shape, in section view, looks like this:


The hole shape is made by drawing a 2D profile them revolving it around the centerline, which in the view below is the on the left side.  The 2D shape, in profile, makes up one half of the hole.


I needed nine such holes but not on a regular pattern.  It turns out there is a way to duplicate features in SolidWorks but using it is a little confusing - the manual page and tutorial are pretty short.  I'm documenting the process here so I can give some tips (and remind myself how to do this a year from now when I probably will have forgotten the whole thing).

The first thing you need to do is to create a coordinate system.  This was for me one of the confusing parts.  The coordinate system defines an orientation (which direction is X, Y, and Z, including which way is positive and negative) and an origin (what point corresponds to coordinates 0,0,0).  There are a few ways to define a coordinate system.  For this, I'm setting an origin, Y, and Z.  From those the software figures our which way is X.

To begin, I've drawn the 'base' into which all these holes will be extruded:


I started the hole by using the hole wizard, but hole wizard isn't magical.  All it does is creates two 2D sketches then revolves the second one around a centerline:


The first sketch does nothing but define the center point of the hole.  The second sketch is the 2D hole shape listed above.

Next, what I did was to create a reference point that marks the center of the hole - essentially what this does is to bring the centerpoint of the hole out of the sketch and up to the 3D drawing.


Now I have my base with one hole in it:


The next step is to define a coordinate system.  In my case, the origin is the center of the hole.  This mean that in my table, the first hole will be at location 0,0 and all the "copies" will be relative to that:


Next I create the table.  I did this in excel.  By default the units will be in the same units as your document, but you can specify 'in' or 'mm' (or any other SolidWorks unit) if you like:


Finally, create the pattern:


A couple of things to note:

  • The coordinate system is placed at the point we created, so that's 0,0 - all the coordinates in the table will be relative to that
  • The "Feature" is the hole, created by the hole wizard (then its shape modified by me)


The result is my baseplate with all of the holes replicated at my X,Y locations:


Now don't ask me what it is (it's a secret) - I'll tell you next month!


Monday, May 15, 2017

Which is better?

I am making a Spring Boot app using Spring Data that has, as part of its function, an embedded wiki. Individual wiki pages have workflows associated with them. Rather than maintain a list of parent/child relationships for pages I'm using an implied hierarchical structure based on the 'path' columns that serve as the coordinates for each page. The hard part is finding only the direct descendants of each page. To do this, I look for paths that include the 'parent' but have no other path separators. In other words, descendants of labs would include /labs/electronics and /labs/bio but would not include /labs/electronics/equipment because, while equipment is a descendant of /labs it is not a direct descendant.

To accomplish this, I do two things:
  • Find the paths that begin with the parent's path, including trailing slash, for example /labs/. This selects all descendants of the parent.
  • Of those, find the ones who have NO OTHER SLASHES beyond the parent. This selects only the direct descendants.
Here are two ways to do it, both produce identical results:

Using JPQL
@Query("select w from WikiPage w " +
    " where w.path like concat(:path, '/', '%') " +
    " AND LOCATE('/', w.path, length(:path)+2) = 0")
public List<WikiPage>
    findDirectChildrenOfUsingAnnotationQuery(@Param("path") String path);

Using the Java-based Query DSL
@Override
public List<WikiPage> findDirectChildrenOfUsingQueryDSL(String searchPath) {
    CriteriaBuilder builder = em.getCriteriaBuilder();
    CriteriaQuer<WikiPage> query = builder.createQuery(WikiPage.class);
    Root<WikiPage> wikiPage_root = query.from(WikiPage.class);

    Expression<String> wikiPage_path = wikiPage_root.get("path");
    Predicate startsWithPath = builder.like(wikiPage_path,  searchPath + "/%");

    Expression<Integer> slashLocation = builder.locate(wikiPage_path, "/",
        searchPath.length()+2);
    Predicate noMoreDescendants = builder.equal(slashLocation, 0);

    query = query.where(builder.and(startsWithPath, noMoreDescendants));
    return em.createQuery(query.select(wikiPage_root)).getResultList();
}

Reasons to use the Java DSL
  • It is more refactorable ... but, a good IDE like IntelliJ can refactor JPQL just fine
  • It's more typesafe ... but not completely so, and again, IntelliJ does a pretty good job. You could even argue that it does better, because the Java DSL can't tell that "path" is a valid attribute of WikiPage, but in JPQL it could
  • Compiler-time errors if you screw up ... but again, IntelliJ already tells me if my JPQL is invalid
  • Certain operations - like the concat and strlen - are arguably better handled in java than by the db engine

The Java DSL is definitely harder to read. But I have a distaste for 'magical strings' which includes JPQL in a @Query annotation.

Thoughts?

Tuesday, September 6, 2016

Dynamic baseref with angular 2

Angular 2 determines how to load 'relative' links using this tag in the main index:

<base href="/">&lt
This isn't a great thing if you want to deploy to other than the root directory of a server. You can find many examples of this causing grief for developers.

Short of manually changing base href before you deploy, the most common solution seems to be to have a little bit of javascript emit the base href into the document before angular loads. Yuck. I managed to work up a more D.I. way to do this that I'll share. No guarantees that this is going to keep working in subsequent RCs (I'm still on 2.0.0-rc.5):

import {RouterModule} from '@angular/router';
import {APP_BASE_HREF} from '@angular/common';
import {ModuleWithProviders} from '@angular/core';
/* all your other imports */


const appRoutingProviders: any[] = [
  {
    provide: APP_BASE_HREF,
    useFactory: () => {
      return window.location.pathname;
    }, deps: [  ]
  }
];
const routingModule: ModuleWithProviders = RouterModule.forRoot(routingTable, {enableTracing: false, useHash: true});

@NgModule({
  declarations: [
    AppComponent, /* list all your other components here */
  ],
  imports: [
    BrowserModule,
    CommonModule,
    FormsModule,
    HttpModule,
    routingModule
  ],
  providers: [appRoutingProviders],
  bootstrap: [AppComponent],
  entryComponents: [AppComponent]
})
export class AppModule {
}


The basic idea is to build a bridge into the initial path then use that as the base. I've been looking for a less error-prone mechanism and haven't found it yet - certainly this could be a little more robust in the form of error checking. If you're like me and want to deploy by scp then it's better than the alternative, having to edit index.html based on where you deploy.

Sunday, May 8, 2016

Changing the catalog on a JdbcTemplate (with Spring)

I had a requirement to change the catalog (i.e. database) with JdbcTemplate. I searched around for a while for an answer and, as is often the case, found a solution scattered across several Stack Overflow and other posts. My configuration is:
  • Spring Framework 4.2.5.RELEASE
  • spring-jdbc (for JdbcTemplate)
  • tomcat-jdbc 8.0.18 (for org.apache.tomcat.jdbc.pool.DataSource)

The key to making this all work is to to extend Spring's DelegatingDataSource and override getConnection() to set the catalog you want:

public class CatalogSpecificDataSource extends DelegatingDataSource {

    private final String catalog;

    public CatalogSpecificDataSource(DataSource orig, String catalog) {
        super(orig);
        this.catalog = catalog;
    }

    @Override
    public Connection getConnection() throws SQLException {
        Connection conn = super.getConnection();
        conn.setCatalog(catalog);
        return conn;
    }
}

The next problem is cleanup: how do you ensure that the connection is reset to the default catalog once it's placed into the pool? The answer is in the tomcat connection pool configuration:

    PoolProperties p = new PoolProperties();
    p.setDefaultCatalog("customers");
    /*
     * set your connection properties here - driver, connection string, etc.
     * then, when you're done with that, add the interceptors
     */
    p.setJdbcInterceptors(
        org.apache.tomcat.jdbc.pool.interceptor.ConnectionState.class.getName() + ";" +
        org.apache.tomcat.jdbc.pool.interceptor.StatementFinalizer.class.getName());
    DataSource datasource = new DataSource();
    datasource.setPoolProperties(p);

The ConnectionState interceptor remembers if you changed the catalog and will set it back. When you create your JdbcTemplate you can now:

    JdbcTemplate t = new CatalogDataSource(realDataSource, "someOtherCatalog");

or use Spring's idea of assisted injection. To do that:

Step 1. Create a factory interface

public interface CatalogSpecificDataSourceFactory {
    javax.sql.DataSource getDatasource(String catalog);
}

Step 2. Create a spring bean configuration:

    @Bean
    @Scope(BeanDefinition.SCOPE_PROTOTYPE)
    public CatalogSpecificDataSourceFactory getCatalogSpecificDatasourceFactory() {
        return catalog -> new CatalogSpecificDataSource(getCatalogSpecificDatasource(), catalog);
    }

Step 3. When you want to use it, inject a CatalogSpecificDataSourceFactory then use it to create your Datasource:

    DataSource ds = catalogSpecificDataSoruceFactory.getCatalogSpecificDatasource("booger");
    JdbcTemplate t = new JdbcTemplate(ds);

Or, if you want to get even fancier, set up another assisted factory. In my case, following the assisted injection pattern once again:

    public interface BatchMissionWriterFactory {
        BatchMissionWriter create(String databaseName);
    }

    /* then, in the config: */
    @Bean
    @Scope(BeanDefinition.SCOPE_PROTOTYPE)
    public BatchWidgetWriterFactory getBatchMissionWriterFactory()
    {
        return catalog -> new BatchWidgetWriterFactory (getCatalogDataSourceFactory().getCatalogSpecificDatasource(catalog));
    }

As usual, hope this is helpful to someone - feedback welcome.

Saturday, January 9, 2016

Reverse engineering a hot tub

I changed the water in my hot tub today and so I had a lot of time on my hands, so I took the controller cover off and tried to figure out how it works. My main purpose was to try to figure out how the control panel interfaces, mainly so that I can contemplate some kind of remote monitoring interface. I know that some models of Balboa controllers have WiFi options, so I figured there must be a communications interface somewhere. There definitely is. The existing (very simple) control panel is connected via an 8-pin RJ-45, and there's a spare one right next to it. There is one removable chip on the board labeled with something looking like a version number. I peeled the sticker off and, surprise it's a PIC18F2420 microcontroller. That's great - I already have programming tools and a C compiler for that. My next step is to try to find a schematic for this board. If I can do that then the feasibility of entirely replacing the control software is high. The hardest part probably would be figuring out how to talk to their existing control panel.